Dawnlight Halls Guide

forbiddenwords
Posts: 321 Arc User
Disclaimer: All info in this guide comes from personal experience/videos i've watched. Some of it might not be 100% accurate or correct, so i stand corrected. Extra info and tips are more than welcomed!
PART 1
Requirements: Lvl 103+ (current or historic level), Chaotic Soul cultivation, Twilight Sky 1+ boundary
Location: Neverfall (East from the city)
Requires x1 Dawnlight Feather to enter (consumed once you enter). Can acquire 5 for first timers, or 1 per day from the NPC outside the entrance (need to have completed the second neverfall pink chain)
- Overview -
The instance is made up of four different paths, each with their own boss: Burning Foundry (Cages/Lava path), Toxic Spring (Wyrm/Colors path), Clockwork Vaults (Dice path), Soulfire Temple (Final path - Great Advisor Natya Veda).
After entering, there is a chest next to the NPC that gives x1 Dawnlight Crystal to whoever digs it (preferably the squad leader). There are four doors, each one opens a different path and requires x1 Dawnlight Crystal to open (consumed after opening the door). You can acquire a Dawnlight Crystal after every path from their boss.
There are 3 difficulties: Normal, Deicide and Judgement.
Each path has different mechanisms and requires different classes to complete (smoothly). Some paths are more flexible/easy than the others. Their difficulty order (in my opinion) is: Colors path (easiest), Dice path (average), Lava path (average), Final path (hardest).
The bosses drop Glyphs (lvl 1), Homestead mats for farms, G17 mats and R8R mats. Finishing the daily quest (activates when entering the instance - kill Great Advisor Natya Veda) will give you x2 random lvl 2 Glyphs.
It's not a very demanding instance gear wise, the bosses do average damage (unless you're tanking them) and it's fairly easy to survive as long as you know what to do. Since full run is possible now, it's advisable to bring decently/well geared people. The instance is pretty time consuming if the squad is not well-made and there isn't enough DD power. The bosses have a lot of HP, so it's advisable to bring good DDs/debuffers to finish quick. I also suggest bringing a mystic along if possible, there will be a lot of deaths at first and their rez buff will come in handy, especially for clerics.
Advisable squad set-up:
1. Barb (advisable, can be replaced with a very tanky person)
2. Cleric (advisable, can be replaced with a Mystic)
3. BM
4. Veno
5. Seeker
6. Mystic
7. Sin (advisable for Death Chain - see Cages path)
8/9. Ranged DDs
10. Random DD
Normal Mode
- Colors Path (Red door) -
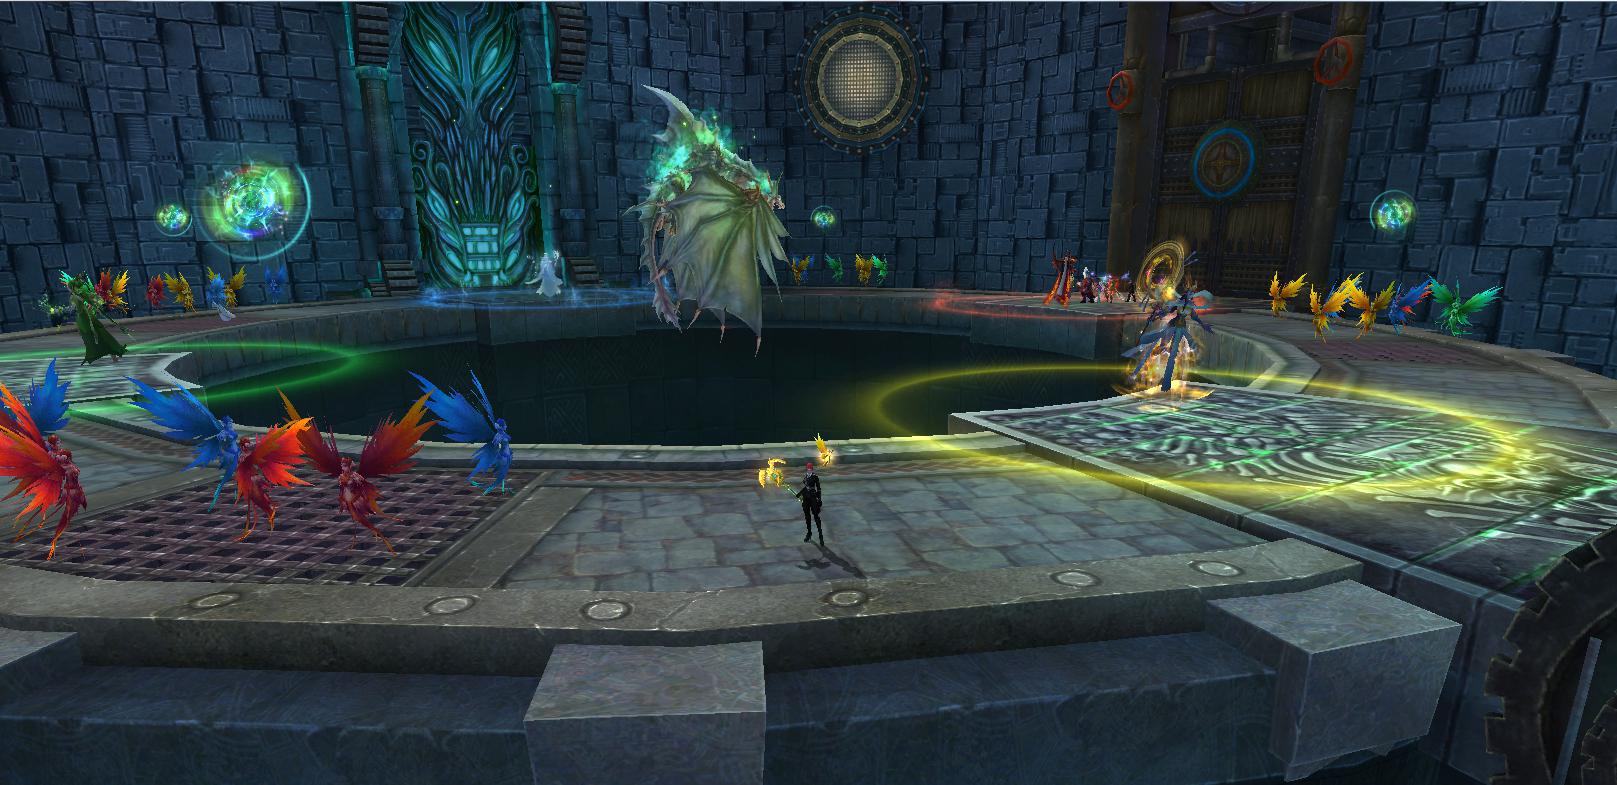
This is the easiest and quickest of paths.
When starting, 4 colored circles will appear on the ground (red, green, blue, yellow) and some fairy mobs will spawn (see picture above). The goal is to bring each fairy to the right color circle and kill the fairy IN THE CIRCLE!
Yellow fairy = yellow circle
Blue fairy = blue circle
Red fairy = red circle
Green fairy = green circle
White fairy = any circle
It's best to have 2 people on each color, and the remaining 2 people "float" and help others if they need backup.
It is very important not to use AoE around other people's mobs, so please pay attention you don't aggro fairies other than your own.
This process lasts 5 minutes or until 1000 points have been gathered overall/100 fairies have been killed. Each color starts with 500 points and gains 10 points per fairy killed. Fairies killed OUTSIDE the circles DO NOT COUNT. You will get a warning 30 seconds before time is up, so be prepared. After that, a platform will appear in the middle of the room and the boss will land (see picture below). You have 5 SECONDS to run to the middle of the platform (watch countdown on your screen). If you stand near the edge, you will die.

Once the boss landed, you have a very short time to get his HP down/kill him. The amount of points you accumulated determines how much time you have to attack the boss - 30 seconds is the max. From time to time, boss will shout something like "In X seconds, player X will be defeated!" and do a cone AoE around the respective player that pushes him and everyone in range back. Make sure you stay close to the boss to avoid being pushed into the red area.
TIP: Standing in the space where the circles connect will drain the energy slower and buy you a bit of time.
When time is up, there will be a 10 SECOND countdown and you have to run back to the edges. After countdown is over, the platform will disappear again and whoever is on it, will fall into the pit and die.
IMPORTANT: AVOID FALLING INTO THE PIT AT ALL COSTS!!! The clerics cannot rez you in there, and you cannot get back to the surface. The only option is going to town and possibly getting stuck outside (the door to the room will be closed until boss is dead and there will be lava in front of it).
Once the platform is gone, the fairies respawn and you have to continue getting points again. Repeat until boss is dead.
TIPS:
- If you fall inside the pit and have any teleporting/jumping skills, go to town, ask someone to stand near the door, use AD/IG to run through the lava and teleport to your squad mate back into the room.
- If you have a seeker in squad, they can use the transposition skill to switch places with someone and teleport them back into the room, then use their own teleport to jump back in.
- If you can do none of the above, wait outside until the boss is dead and door will open.
- If too many people die and can't get back in, it's best to reset the path and start over.
- When running on and off the platform, try to be as quick as possible. Rubberbanding is a huge problem here so be very careful.
- The boss will attack whoever has aggro the entire time, it's best to try and let the barb or a tanky person take aggro if possible (whoever opens the path will have aggro on boss at start)
Full path video:
 https://www.youtube.com/watch?v=8g0cBb3nNyg
☆ Pixel ♥ Heart ☆ Etherblade ☆
Post edited by forbiddenwords on
0
Comments
-
PART 2
- Dice Path (Blue door) -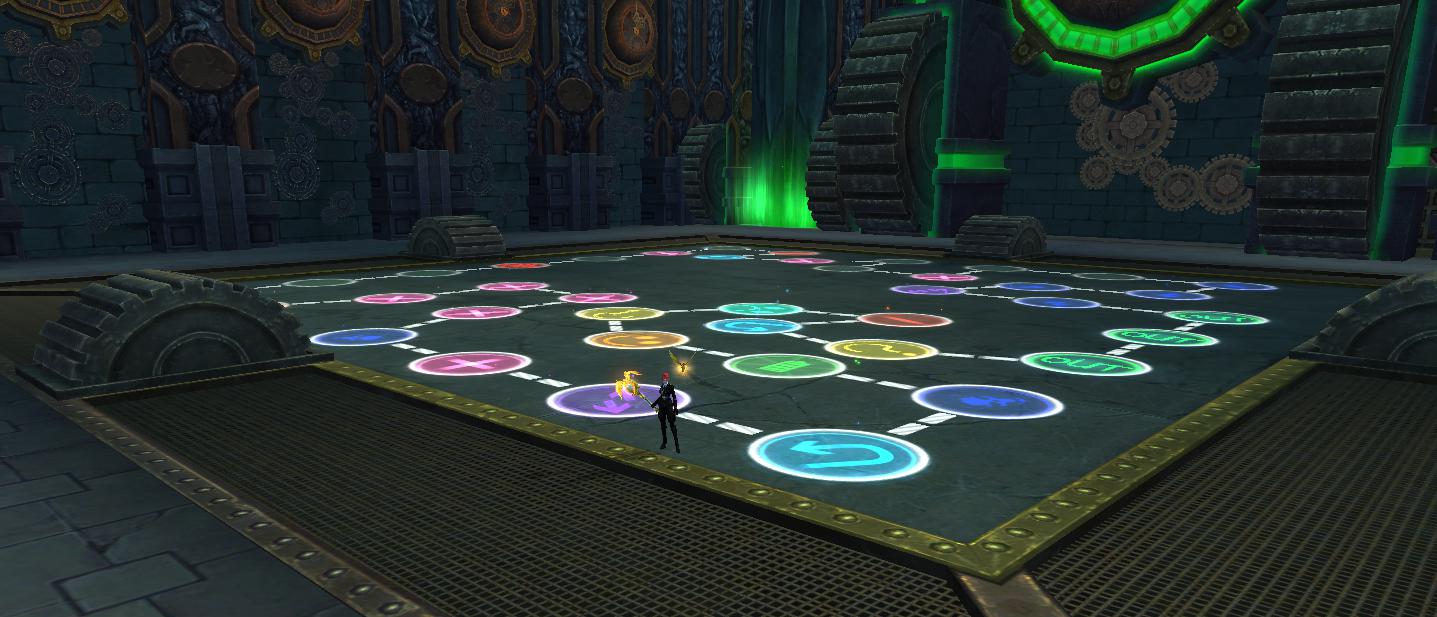
This path is fairly easy in terms of survability, though the mechanics are more complex. It might be a bit confusing at first and it can be pretty time consuming if not done right.
The first room is gonna be full of "question mark mobs". Killing them reveals the symbols on the game board, so AoE to your heart's content! Once all the "?" are killed, the board will activate and you can move on to the next room, the actual "playground".
The goal of the room is to get the little robot mob to move across the board by "spinning" the big die in the middle of the room. Once you start, a quest will appear that tracks your progress:
Energy (starts at 10.000): determines how much HP the final boss will have. The more energy you have at the end, the less HP boss will have. Having too little energy will have an opposite effect,
increasing the boss' max HP (credit to @shopcheese for info)
Battery (0/1): required to finish the puzzle
Turns: the amount of turns the happy/sad face effect is active
Each symbol on the board has a different effect when you trigger them (aka when the robot stops on them):
IN = starting point
OUT = end point
+ = adds energy
- = removes energy
happy face = increases the amount of energy gained and prevents energy loss when stepping on a "-"
sad face = increases the amount of energy drained (and prevents energy gain when stepping on a "+" ?)
? = makes the robot advance (random number between 1 and 6)
⇆ = causes all the + and - on the board to switch places (credit to @capnk for info)
⮎ = changes the robot's movement direction (credit to @capnk for info)
skull = spawns mobs that you have to kill quickly and drains energy; the longer you take, the more energy is drained
battery = the goal of the game, need to collect in order to finish the game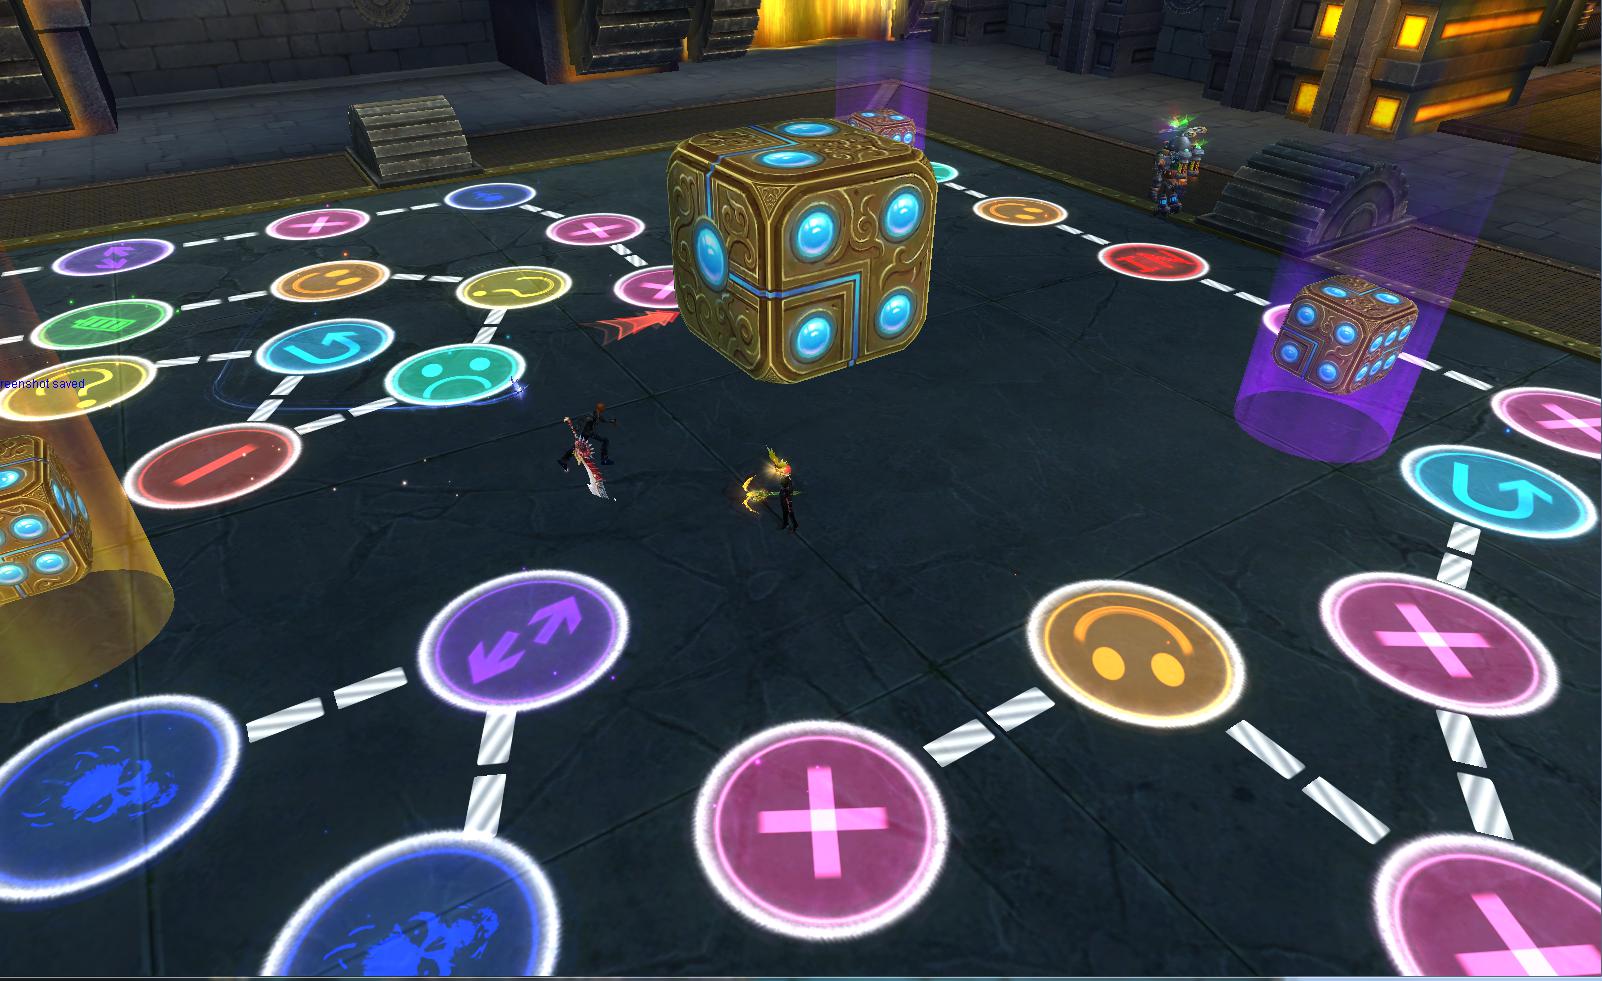
Attacking the big die will spawn 3 smaller dice in each side of the board (see picture above). Each smaller die gives a direction (Up or Right). Killing the small die will make the big die turn in the given direction (killing Small Die: Up makes the big die turn upwards, killing Small Die: Right makes the big die turn to the right). The final number you get after killing the last small die will be the number of steps the robot moves on the board, so pay attention to the order in which you kill the dice!
NOTE: The number taken into account on the big die is not the one on top. It is the one on the side, towards which the red arrow points. It will also be highlighted when the die turns.
Example:
With this setting, and assuming we have x2 Small Die: Right and x1 Small Die: Up, we have the following possibilities:
A. Kill 1 Small Die: Right => big die turns to the right; resulting number is 3
Kill 1 Small Die: Right => big die turns to the right again; resulting number is 6
Kill 1 Small Die: Up => big die turns upwards; resulting number is 5 => robot moves 5 steps forward
B. Kill 1 Small Die: Right => big die turns to the right; resulting number is 3
Kill 1 Small Die: Up => big die turns upwards; resulting number is 5
Kill 1 Small Die: Right => big die turns to the right again; resulting number is 6 => robot moves 6 steps forward
C. Kill 1 Small Die: Up => big die turns upwards; resulting number is 5
Kill 1 Small Die: Right => big die turns to the right; resulting number is 3
Kill 1 Small Die: Right => big die turns to the right again; resulting number is 2 => robot moves 2 steps forward
You will always get either 1 UP and 2 Rights or 2 Ups and 1 Right for the dice controller mobs.
For either of these cases there are 3 possibilities, and these are the results.
1 Up and 2 Rights
RRU = Bottom Face
RUR = Back Face
URR = Top Face
2 Ups and 1 Right
UUR = Left Face
URU = Back Face
RUU = Right Face
The faces are named from the perspective of looking at the Front Face which is the selected face with the red arrow.
Tips
- Opposite faces always add up to 7, just like on a standard die.
- The Back face is reachable in either configuration so you can plan ahead however many turns you want of flipping between the front and back faces.
(credit to @asterelle for info and tips)
The best strategy is to calculate where the robot should move, check what directions you have available, try all possibilities and see what final numbers they give, and go with the order that is most beneficial. Make sure everyone focuses on the same die when killing them so the order isn't messed up.
The game finishes when you have the battery and put the robot on the "OUT" sign. Once the puzzle is complete, you may move on to the next and final room where boss awaits.
This room has similar mechanics to the previous one, except there is no game board anymore. Once you start the boss, one of the bars on the glowing circle will disappear and you have to make the robot land on it to "fix it". There will be small dice and a big die again, so it's completely the same as before.
BUT!
Every failed attempt of getting the robot on the missing bar will give the boss a shield buff that reduces your damage to 1 (the shield has about 300.000 HP and it stacks up with every mistake). On top of that, the boss purges and puts a debuff on you that increases skill cooldown (you need to use 5 skills to make it go away, try to use your most useless skills - genie skills work too).
Once the robot "fixes" the seal again, the boss heals to full HP and you have to repeat the process one more time when his HP drops to about half.
After you fix the seal once again, the boss will ask you to roll a 5+, and finally, to roll a 6. After that, his deaden buff will go away and you can kill him.
NOTE: Boss does a kind of cone AoE but it's not lethal, though it's still best to ask the person holding aggro to keep it away from squad.
TIPS:
- Don't rush, every mistake can cost you extra time to finish the run.
Full path video: https://www.youtube.com/watch?v=4DFHWXkWXP0&t=4140s
- Lava/Cages Path (Purple Door) -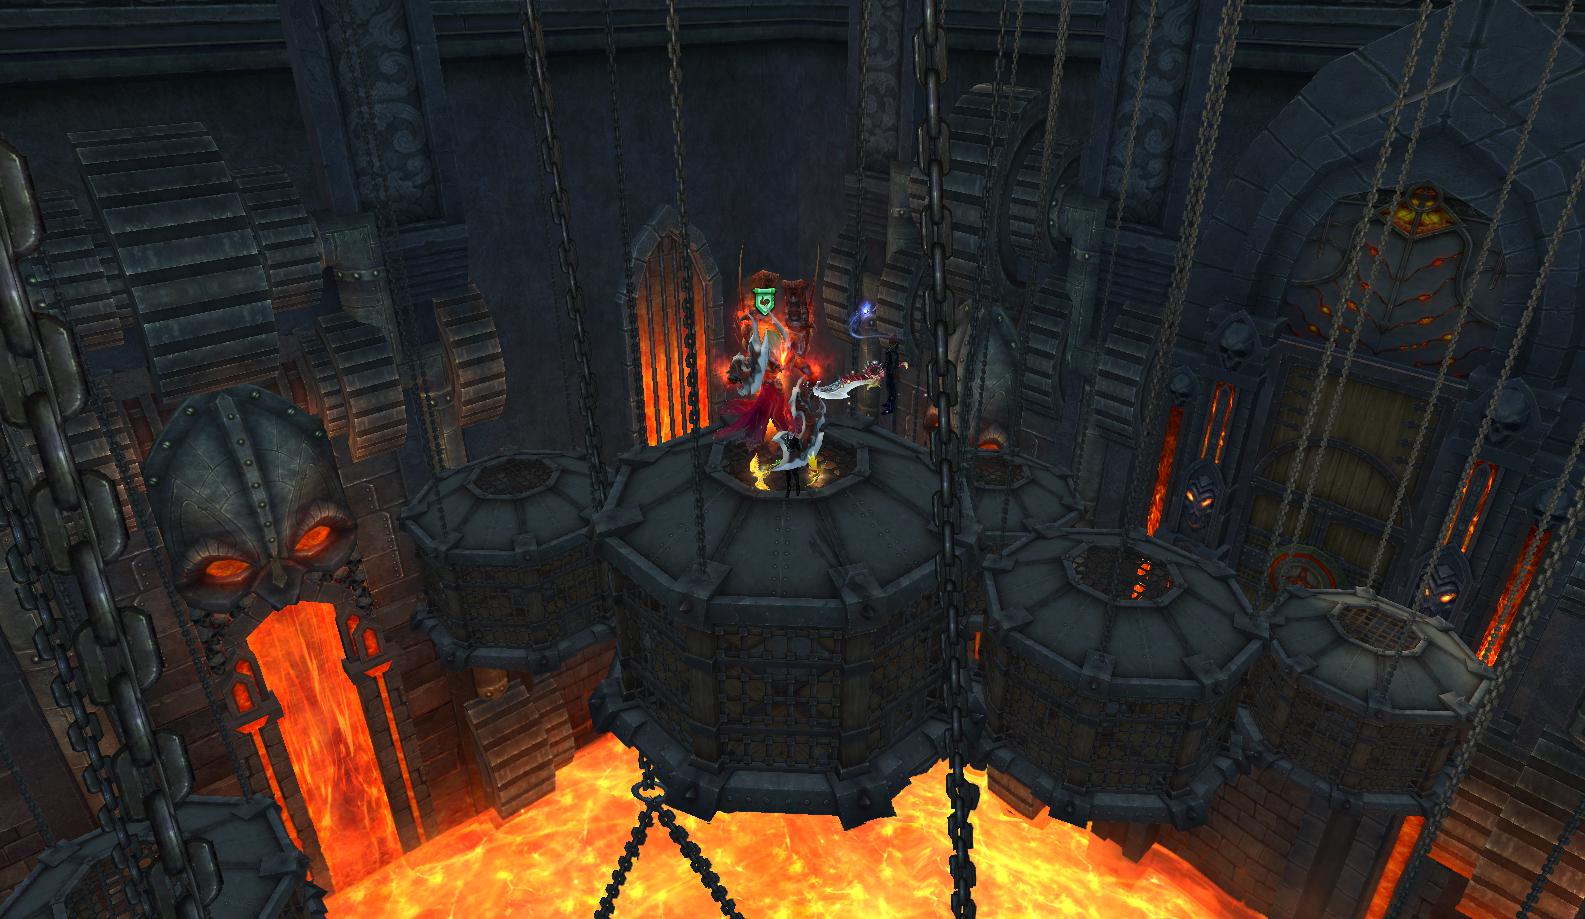
This path is one of the most "painful" in my opinion, there's usually a lot of deaths until everyone learns the mechanics. For this path, having a barb is advisable to hold aggro on last boss.
NOTE: I don't have a lot of experience on this path so some information might not be 100% accurate, I stand corrected.
First room:
There are two possibilities to this room:
A) Have a sin use chain on the flying boss and sacrifice himself for the glory of Satan (I think he has to stand on one of the cages when they start turning red, jumping into the lava won't work - not 100% sure)
B ) Do it the normal way:
The goal of this room is to kill the flying boss while jumping on the cages, avoiding the lava from down below and any other (lethal) obstacles. Once you start, a flying boss will appear (make sure you have enough ranged DDers to kill him). The more his HP drops, the trickier things get. The cages will start turning red and standing on them will kill you, so jump to safety as soon as possible. On top of that, the lava level will slowly go up - you need to kill the mob that spawns on cages to keep the lava from drowning you.
Once the flying boss is dead, you are free to move on to the next (and final) room.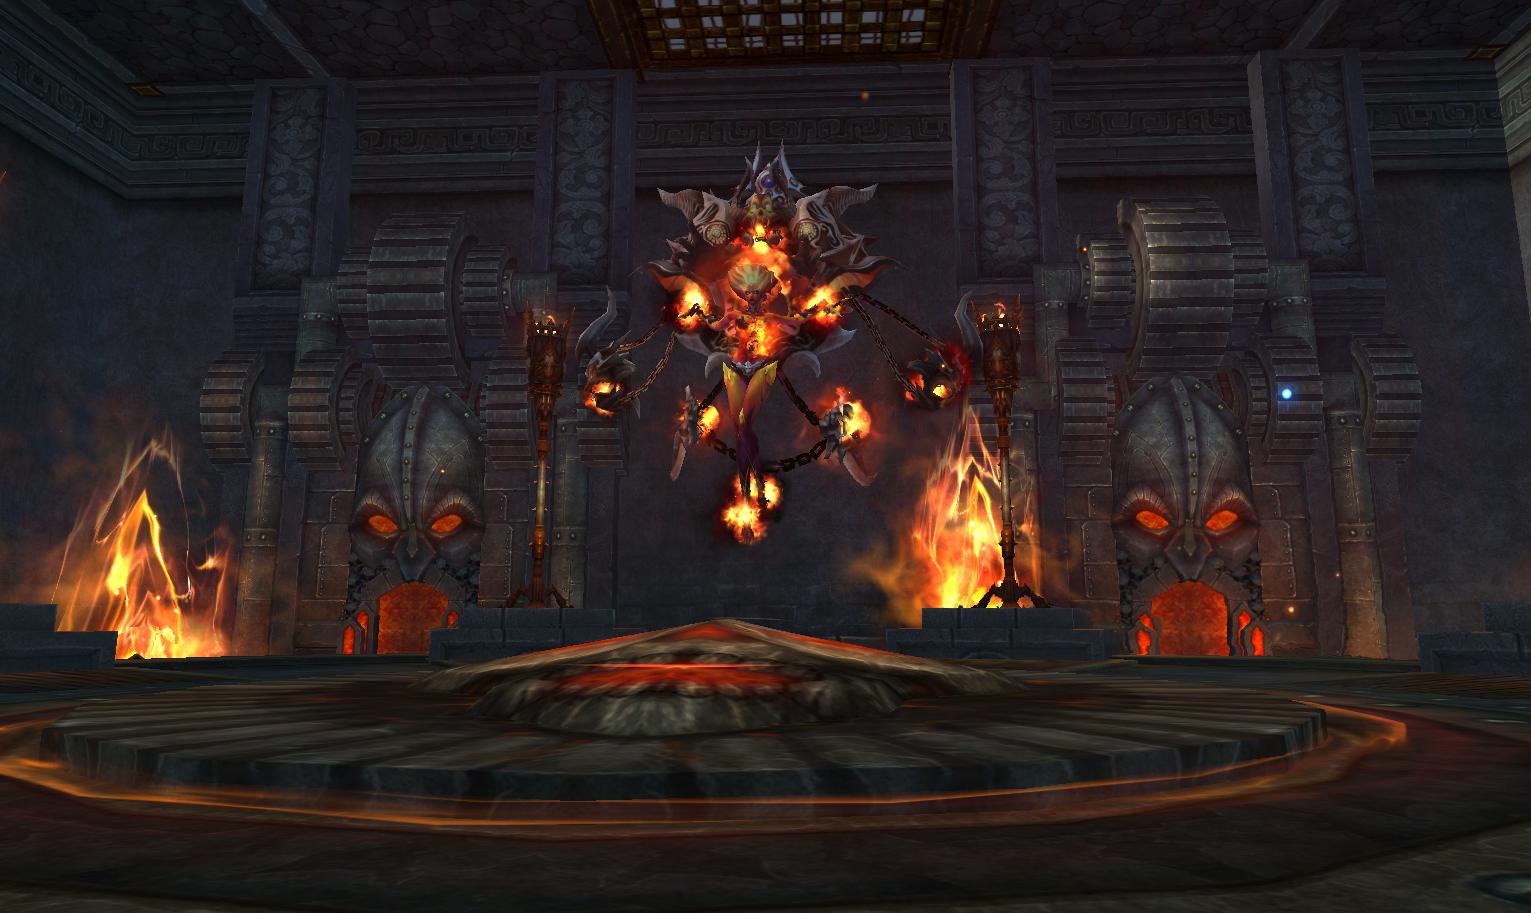
This boss is tricky as well. It is advisable to take it slow, spark killing will most likely end up in a squad wipe.
Like in the previous room, lava will start rising here as well, so be very careful to the hints given on screen. As the boss' HP starts going down, he will spawn a mob on the edge of the platform (Cursed Shambler) - kill them FAST - they make the lava level go down. DO NOT KILL THE BOSS TOO FAST - if you do, the mob will disappear and you are bound to drown in lava. It's best to have the barb/tank hold aggro of the boss while squad focuses on killing the adds whenever they spawn, so pay attention to the messages on screen!
The boss also does a cone AoE (not sure if it's lethal but it sure as hell hurts, so ask the barb/tank to point it away from the squad), and smaller AoE circles that you have to avoid. He also does a push-back, so when you see the message "Get close to the center of the platform or you will be defeated down below!", get close to the boss to avoid getting pushed into the lava. Standing in front of an obstacle also works. Another message to look out for is "Players have been cursed, gather quickly to defend!" - though I'm not entirely sure how that one works yet.
At some point, the boss will disappear and you will be asked to kill "Purgatory Traps" . You need to jump on the small platforms around the room and kill all Lava Triggers (see picture above). Not sure if there's a time limit to it, but it's best to get it done ASAP. Start with the lower triggers in case the lava starts going up and drowns them. After all of them are killed, get off the small platforms ASAP, they become unsafe.
Repeat all the steps above until boss is dead.
TIPS:
- If you die and have to go to town, there should be a portal near the door that teleports you back inside. But be careful, it disappears after boss dies and whoever is not in the room will be stuck outside!
Last room video: https://www.youtube.com/watch?v=4IeYih7uYbc
Full path video: https://www.youtube.com/watch?v=GbH9vAN6ec0&t=90s
Post edited by forbiddenwords on ☆ Pixel ♥ Heart ☆ Etherblade ☆0
 -
PART 3
- Final boss (Great Advisor Natya Veda) -
After completing all of the other paths, the door to the final path will open. There are three parts to this path.
•First part:
After opening the path, some skeleton mobs will spawn in the room. They have a shield buff and are pretty much unkillable. You have to drag them to the lighted areas in the corners of the room to remove their buff and kill them. A large lantern will spawn in the center of the room and some "ghosts" will start walking around in a circle. Stay out of their way, they will kill you! You need to look for the "Innocent Soul" ghost that does not have a cloud at its feet and that walks much faster than the others. Kill this mob a total of 5 times to spawn the boss.
The boss doesn't do anything special, he will continue spawning skeletons that you have to kill and he does a cone AoE (not lethal but hurts a lot, so best to avoid it). He will also spawn several "ghosts" and ask you to kill at least 5 of them within 35 seconds (not sure what happens if you don't).
(credit to @capnk for info)
•Second part:
After boss is dead, rush through the door and exit the room ASAP or you will die (follow the arrows on the ground). An "evil", unkillable version of the boss will spawn and stalk you through the Molten Passage and kill you if he reaches you. You have to kill the Death Ward mobs to advance through the passage, but watch out, if you get too close they will kill you!
NOTE: You will need some good ranged DDs to kill the Death Wards quickly and safely.
On top of that, some other mobs will spawn that push you off the bridge and make you fall into the lava. They will PM the person they are going to push, so watch your chat. Have the close range DDs kill the adds while the ranged DDs focus on Death Wards. Once you reach the end of the passage, you have to kill the FMI Summoner boss quickly to advance.
All of that while running from the creepy, immune boss that's following you to kill you!
(credit to @capnk for info)
TIP:
1. Let the boss before that part squadwipe you, so you can respawn -> jump over the door, so all the DDs are completely ready at the lava path before someone digs the door and starts that phase.
2. The first run down the lava path could be used as a ''preparation run'', after killing 2 or 3 death wards someone tanky (Bob) with res scroll/mystic res can IG rush to the end and hug the door at the end. After that the whole squad kills themselves and does what i explained in tip 1. The reason this is effective is because all the adds that walk down that path spawn at the door where Bob is laying dead. He can use his mystic res/res scroll to get back up and stay there, if he hugs the door he wont die. Once the phase starts all the mobs that spawn will get aggroed on him so they won't walk down the bridge and won't knock people off. Neither of these tips are really needed in regular or deicide mode, but in Judgement Mode it was basically the key to our success.
(credit to @dingo488 for info)
•Third part:
If you've made it this far, congrats! You have reached the end of your destination and can finally meet Great Advisor, Natya Veda.
Her attacks are similar with the last boss in Heavenfall Temple, meaning she will use Oblivion once her HP has dropped to a certain percentage (Oblivion is a 1 shot AoE that lasts for 22 seconds). She will AoE when her HP reaches 35m (?), 20m and 5m.
Do not nuke the boss unless you are 100% sure you can SK it, otherwise you are very likely to squad wipe.
After you DD the boss a bit, two portals will spawn on each side of the room and some mobs will walk into them as "offerings". Do not kill them! If you do, they will spawn ghost mobs that do a lot of damage (they are untargetable). When the "offerings" reach the portals, Ritual Puppet mobs will spawn. You have to lead 3 of them into a blue circle in the room to form a "Soul Vessel" mob. Killing the Soul Vessel spawns a yellow shield on the ground (Lantern of Hope) that protects you from Natya Veda's Oblivion for 45 seconds. But be careful, if two Soul Vessels are alive at the same time, they will form a Hummel's Will that kills everyone.
Strategy my squad used: Have the cleric BB close to the blue circle so they are in the bubble/shield's range when it spawns. A few ranged DDs kill the "offerings" on one side of the room to prevent too many Ritual Puppets/Soul Vessels from spawning. If the cleric is not too squishy they should be able to handle the dmg from the ghosts that spawn. Let the offerings on the other side of the room do their thing so they can spawn Ritual Puppets. That way there won't be a surplus of Soul Vessels to put your squad in danger.
NOTE: Make sure you time it right so you always have a shield ready for when boss drops the AoE.
Repeat steps above until boss is dead.
(credit to @asterelle for info)
TIP: If you are SK-ing boss, use skills that slow down channeling. That way boss will cast his shield slower and you are more likely to interrupt him. (credit to @dingo488 for tip)
Congrats, you made it!
Full instance video guide by Ruby Inferno: https://www.youtube.com/watch?v=9DEQsiruapo
Deicide Mode
NOTE: The squad leader needs to have completed full Normal mode run to open Deicide mode.
All bosses have the same mechanics as in Normal mode, with a few additions:
Colors Path:
Poison pools will spawn that can kill the fairies. You have to avoid them/run around them. If a fairy dies from the poison pools, it will spawn Dark Fairies that come to the circles and drain your points. You have to try to kill them before they get there.
Cages Path:
The regular boss also spawned some Fire Elementals that you have to kill or else they recover the boss HP.
Dice Path:
Requires you to get 2 batteries instead of 1. The boss also does the "cone shaped" attack that one-shots players. The cone always travels clockwise around Carol. So you can avoid it by circling her continuously. The speed at which the cone appears seems to be random, and is not affected by whoever has aggro of the boss.
Final Path:
No info yet
NOTE: Deicide mode also gives you a red quest to kill Natya Veda and the chest she spawns once killed. The quest gives you two Lv3 Glyph packs. I don't know if the red quest is a one-time quest or it's repeatable.
(credit to @catgirldesu and @capnk for info)
Judgement Mode (stub)
NOTE: The squad leader needs to have completed full Deicide mode run to open Judgement mode.
The mechanics of the Normal and Deicide modes are preserved, with several additions.
Colors Path:
The Wyrm no longer flies around the room. He will stand in the middle of the room, above the pit, reeling everyone in at a specific time interval. He will give you a warning 5 seconds before, shouting "Watch out!". Make sure you don't stand too close to the edge of the pit, or you will be dragged into it.
The boss will also aggro a random person like before, dealing a lot of damage to the person aggroed. Healing whoever the boss targets will make you steal aggro, so if you're a cleric or mystic, be careful.
NOTE: If you die and go back to town, you can jump over the lava at the entrance, hug the door, and let boss reel you in through the door.
(credit to @shopcheese for info)
Cages Path:
No info yet
Dice Path:
You are now required to collect 4 batteries.
Carol's cone-shaped AoE does no longer travel clockwise, but randomly. Additionally, the shield buff she/he receives whenever you roll a bad number is stronger.
(credit to @shopcheese for info)
Final Path:
In the Molten Passage, adds will now spawn arrows on the ground that show the direction in which you will be pushed. You have to try to stun/interrupt them quickly, killing them will be hard because there will be too many of them. Timing is very important here. You can also try to position yourself in such a way that you won't get pushed off the bridge.
(credit to @shopcheese for info)
Drops: Natya Veda can drop lvl 4 Glyphs.
Full Judgement Mode run video: https://www.youtube.com/watch?v=7XzHsxO8Kik
Full Judgement Mode run (with guidelines): https://www.youtube.com/watch?v=Q-Q3DwsmgdU Post edited by forbiddenwords on
 ☆ Pixel ♥ Heart ☆ Etherblade ☆0
 -
This is very odd, because I saw the post, and I even made it a sticky. Then somehow AFTER this, the spam filter ate it.forbiddenwords wrote: »(Repost cause my previous thread got swallowed by the spam filter i guess)
I can restore the original if you would like.0 -
I'll stick to this one since I've made a few modifications to it already, thanks for the sitcky

Edit: spam filter caught it when I was trying to edit it. It's not the first time it happened to me, this forum is weird @_@ ☆ Pixel ♥ Heart ☆ Etherblade ☆0
 -
forbiddenwords wrote: »IN = starting point
OUT = end point
+ = adds energy
- = removes energy
happy face = increases the amount of energy gained
sad face = increases the amount of energy drained
? = makes the robot advance (random number between 1 and 6) - not 100% sure
arrows = no info yet, haven't tried (maybe changes the robot's movement direction?)
skull = spawns mobs that you have to kill quickly and drains energy; the longer you take, the more energy is drained
battery = the goal of the game, need to collect in order to finish the game
The arrows going two opposite directions cause all the + and - on the board to flipflop.
The turnabout arrow causes the robot to start traveling the opposite direction. This could be good or bad depending on where you are on the board currently.
The ? mark does indeed move the robot a random number of spaces. Very dangerous.
I'm not sure but you may need the "energy" to be more than zero before you hit the OUT space. If that's not it then I don't know what energy does.
The blue cone the boss uses puts a horrible version of the DB cooldown debuff on your character. It takes like 6 ability uses before it goes away. Whoever has agro needs to keep this off the party.
0 -
The arrows going two opposite directions cause all the + and - on the board to flipflop.
The turnabout arrow causes the robot to start traveling the opposite direction. This could be good or bad depending on where you are on the board currently.
The ? mark does indeed move the robot a random number of spaces. Very dangerous.
I'm not sure but you may need the "energy" to be more than zero before you hit the OUT space. If that's not it then I don't know what energy does.
Thanks for the info!
I think the lowest energy I ever hit was around 6k but by the end of the game it went back to like 11k so you could be right, I have no idea. I know the final amount of energy you get when you finish the game reduces Kailia/Carol's HP by a %. For example one time when i finished with 14k energy, his HP was reduced by 32%, and when i finished with around 11k, it was reduced by 15-17% or something like that. So the more energy you have at the end, the less HP boss will have.
The blue cone the boss uses puts a horrible version of the DB cooldown debuff on your character. It takes like 6 ability uses before it goes away. Whoever has agro needs to keep this off the party.
The AoE only does damage, I just checked the video as well to make sure (you can see at around 1:10:00 time on it). It's not super strong but enough to raape your charm if you don't get constant heals
He does the DB debuff(+purge and shield) when you roll a wrong number on the dice and it affects everyone nearby (if you check video at about 1:12:00, when it says "Carol is absorbing energy", boss gets a 400k+ shield buff and soon afterwards everyone gets the debuff+purge) ☆ Pixel ♥ Heart ☆ Etherblade ☆0
 -
A couple more tips about dice spinning:
You will always get either 1 UP and 2 Rights or 2 Ups and 1 Right for the dice controller mobs.
For either of these cases there are 3 possibilities, and these are the results.
1 Up and 2 Rights
RRU = Bottom Face
RUR = Back Face
URR = Top Face
2 Ups and 1 Right
UUR = Left Face
URU = Back Face
RUU = Right Face
The faces are named from the perspective of looking at the Front Face which is the selected face with the red arrow.
Tips
- Opposite faces always add up to 7, just like on a standard die.
- The Back face is reachable in either configuration so you can plan ahead however many turns you want of flipping between the front and back faces.0 -
Thanks for the info and tips, they will definitely come in handy! Added them to the guide

 ☆ Pixel ♥ Heart ☆ Etherblade ☆0
 -
Thanks for going through the trouble to write this guide!
If you don't mind, I'd like to add this to the PWI Wiki page for Dawnlight Halls. 0
0 -
No trouble at all, I'm happy if people find it useful!

I would be more than happy if you did, though I will probably keep adding to it until the whole instance is functional and I can fully explore it xD ☆ Pixel ♥ Heart ☆ Etherblade ☆0
 -
Fourth area: Drag the skeleton mobs into the lighted areas to remove their buffs and make them killable. After the large lantern spawns in the center of the room, some mobs called "Innocent Soul" will start walking around in a circle. You want to look for one of these that does not have a cloud at its feet and that walks much faster than the others. Kill this mob a total of 5 times to spawn the boss.
When the boss dies you have to run quickly and follow the arrows on the ground. If you stay in the room you will die. An invincible mob will start chasing you across the lava. Kill the Death Ward mobs to make it safe to advance forward. Smaller mobs will attack also, but concentrate on the Death Wards to get across in time. Then kill the Summoner quickly before the super mob gets to you.
Edited with better information about the skeleton part.Post edited by capnk on0 -
Well, we nuked Natya Veda before she got to do anything so no idea what's her mechanics. I'll post again if I learn more.0
-
Full DH I did this morning. Would love to share with everyone
 https://www.youtube.com/watch?v=rD54Evhyuis 0
 -
Removed, see better explanation by Asterelle below.Post edited by capnk on0
-
Last boss is:
You DD boss until two portals appear on the sides of the room. Mobs will wander into the portal as an offering. If you kill them before they reach the portal they spawn an untargetable ghost for around 10s that can one shot you.
Don't kill them, you want to let them into the portal at which time they spawn an invulnerable Ritual Puppet mob.
Lead 3 puppet mobs into the blue circle and they combine to form a Soul Vessel.
Kill the Soul Vessel and it drops a Lantern of Hope for 45 seconds.
If you stand in the circle around the Lantern you can survive the bosses "Oblivion" attack which lasts for 22 seconds.
You want to time killing the Soul Containers so you have a Lantern ready for Oblivion.0 -
Deicide mode (I might be wrong on some things, just based on what I observed):
Colors Path:
Poison pools will spawn that can kill the fairies. You have to avoid them/run around them. There are also Dark Fairies that come to the circles and drain your points. You have to try to kill them before they get there.
Cages Path:
The regular boss also spawned some Fire Elementals that you have to kill or else they recover the boss HP.
Dice Path:
Requires you to get 2 batteries instead of 1. The boss also does the "cone shaped" attack that one-shots players. It's random and is not affected by whoever has aggro.
Deicide mode also gives you a red quest to kill Natya Veda and the chest she spawns once killed. The quest gives you two Lv3 Glyph packs. I don't know if the red quest is a one-time quest or it's repeatable.
Post edited by catgirldesu on0 -
catgirldesu wrote: »Dice Path:
Requires you to get 2 batteries instead of 1. The boss also does the "cone shaped" attack that one-shots players. It's random and is not affected by whoever has aggro.
The cone always travels clockwise around Carol. So you can avoid it by circling her continuously. The speed at which the cone appears does appear to be random.
0 -
Question... On Lava Path...
What do you have to do when this message appears?? "Players have been cursed, gather quickly to defend!"
As a barb player, It's hard to "gather together", when I'm tanking the boss to keep cone away from my team, Or When they are killing the add... I died SO MANY TIMES... O_o
We tried together few times, we tried disperse... At end we carried on, and killed the boss while dying/ressing... Without a conclusion about how to deal with that curse.0 -
Dice boss HP was increased by like 110% I think when we reached OUT on ~2000 energy. And decreased by 32% when around 11k energy (If I remember right, I didnt pay that much attention to the exact numbers)
At the fire boss with the cages, if a sin sacrifice themselves using death chain they must not be in stealth.
The dragon fairy boss w/e during the collecting phase:
In Judgement mode, the dragon will be in the middle above the pit REELING IN EVERYBODY towards him every ? second. careful you dont fall down! you'll have a 5 second warning with the text "Watch out!" before it happens. Just dont stand too close to the pit edge. Also, the boss will agro someone, dealing loads of single target damage. The boss itself cannot be damaged, so you cannot build up any agro - a mystic/cleric will get instant agro if they heal the person that tanks.
If someone dies and you are back to the beginning, if you hug the door to the room, the boss can actually reel you through the door, that way you wont need a seeker to transfer you if you lack jump skills.0 -
Thank you all for your inputs and info, I'll update the main post when I have some spare time!
EDIT: Updated, thank you everyone who helped with videos/tips/info so far!Post edited by forbiddenwords on ☆ Pixel ♥ Heart ☆ Etherblade ☆0
 -
Note: You can chain-kill the miniboss on lava path, but the "real" boss glitched for us when we tried to chain it and we had to reset the path (boss disappeared).0
-
We did dice boss on Deicide and finished with 16000 energy. That reduced her hp by 48%.0
-
Question, how do u prevent Hummel's Will spawning on last boss? This dude randomly spawns and 1 shots us.
0 -
Question, how do u prevent Hummel's Will spawning on last boss? This dude randomly spawns and 1 shots us.
Do not let Soul Vessels live too long - if you let one live too long Hummel seems to spawn. This is just a guess but after we did this Hummel did not spawn any longer so it might be correct.0 -
I'm pretty sure 2 Soul Vessels alive at once merge into Hummel. Similar to how 3 Ritual Puppets merge into a Soul Vessel.0
-
I was too lazy to type more the other day so heres more info.
Judgement mode dice part requires 4 batteries.
The red cone have a different pattern than in deicide. Cannot rely on it travelling clockwise. Im not sure if its a specific pattern or random. Also it doesnt kill veno pets (yay!)
For all modes; purge+db debuff only appear every failed attempt to roll whatever number you need, this also gives the damage shield. Shield is stronger the harder the mode is set.
For the colors/fairy again (deicide+judgement), its when the fairy dies in the poison pools that makes the dark fairy spawn. Dark fairy spawn at boss and goes towards one of the color npcs (possibly the color of fairy that died?) And will drain that color's energy if not killed. The dark fairy can be CCed and pushed back as well.
Final part; at the road (where boss stalks you from behind) an arrow will appear under the mob when it try to push someone. It can be stunned/interrupted. Timing this is very important in judgement as there will be a heavy amount of mobs, you just wont have the time to kill everything.
Another option is the person it have target can also position themselves in such way they wont get knocked off the road. The arrow shows the direction they will be pushed.0 -
shopcheese wrote: »The red cone have a different pattern than in deicide. Cannot rely on it travelling clockwise. Im not sure if its a specific pattern or random.
Yeah my observation is that it's random in Judgment and clockwise in Deicide.Also it doesnt kill veno pets (yay!)
They ignore Oblivion mode from Natya also!
0 -
Question... On Lava Path...
What do you have to do when this message appears?? "Players have been cursed, gather quickly to defend!"
As a barb player, It's hard to "gather together", when I'm tanking the boss to keep cone away from my team, Or When they are killing the add... I died SO MANY TIMES... O_o
We tried together few times, we tried disperse... At end we carried on, and killed the boss while dying/ressing... Without a conclusion about how to deal with that curse.
I have the same experience with that part. We tried to gather but looked like that made us die even more. In the end I tried to stay away from others when that message appeared and I managed so survive, but can't tell if it was just luck or I was doing something right I guess as a barb it really is a problem if you die, ours had the same problem and I tried to rez him asap so we managed to keep it together
  ☆ Pixel ♥ Heart ☆ Etherblade ☆0
 -
I don't know if you want to include these, but I'll leave them here:
My Judgement mode video: https://youtu.be/Q-Q3DwsmgdU
@dingo488 's Judgement mode video: https://youtu.be/7XzHsxO8Kik 0
Categories
- All Categories
- 181.9K PWI
- 697 Official Announcements
- 2 Rules of Conduct
- 264 Cabbage Patch Notes
- 61K General Discussion
- 1.5K Quality Corner
- 11.1K Suggestion Box
- 77.4K Archosaur City
- 3.5K Cash Shop Huddle
- 14.3K Server Symposium
- 18.1K Dungeons & Tactics
- 2K The Crafting Nook
- 4.9K Guild Banter
- 6.6K The Trading Post
- 28K Class Discussion
- 1.9K Arigora Colosseum
- 78 TW & Cross Server Battles
- 337 Nation Wars
- 8.2K Off-Topic Discussion
- 3.7K The Fanatics Forum
- 207 Screenshots and Videos
- 22.8K Support Desk








 https://youtu.be/RkkWkigYd3k