test content
Logo
What is the Arc Client?
Install Arc
Battle Tactics: Lair of the Mad Mage


The Lair of the Mad Mage is the epilogue to the Undermountain campaign and will see you venturing into Halaster’s domain to face his two apprentices, Arcturia and Trobriand. Halaster’s lair is much like his mind: jumbled, insane, and full of wonder and grandeur!
The beginning of the dungeon goes without too many difficulties, killing the various enemies who will have the misfortune to cross your path before arriving at the first Boss Acturia.
First boss: Arcturia

In this room, in its center Acturia will extend its arms to you, eager to fight you out. At the four corners of the room before hiring the first boss, the group must agree on the group chat to know who will take which corner (at each corner its color):
- Green on the right of the stairs (usually for the tank and the healer)
- Blue on the left of the stairs
- Yellow and purple at the back of the room.
During this first boss fight, the healer of the group will have the most difficult role (managing its divinity, and keeping its daily power in order to resurrect the reckless players caught in the cocoons of death)
- During the whole fight: butterflies can appear: if you see that your character starts to struggle and can no longer attack, you will have to move the boss and get out of these clouds of butterflies.
- Phase of Mimics: when the boss will have about 75% of his life left, it will trigger a phase of Mimics (the room will be filled with butterflies): mimics will appear at the 4 corners of the room, marked by 4 different colors.
- It is important to destroy the mimics before they reach the center, otherwise it will reveal a multitude of tough little enemies with many health points. If there are too many, the fight will be impossible to end. The challenge for the DPS will be to be powerful enough to destroy Mimics as quickly as possible. In general, DPS will have to destroy 2 to 3 mimics to end this phase (this phase occurs on average twice).
- Phase of Cocoons: the healer, will be put to severe tests during this first game under penalty of seeing the fight fail. Immediately after the mimic phase: a random player, except the healer, will be transformed into a cocoon (surrounded by red butterflies). It will have a very short time to heal him: if within the time limit, the healer fails to destroy the cocoon, it will explode and kill the player and all those in the vicinity. To avoid this, the healer must imperatively keep its daily power and use Intercession for example. A particular mention concerning the tanks, which are more difficult to treat because of their high amount of Hit Points (also be careful to keep away from the tank when he/she is in cocoon). Example: if the player has 300k Hit Points, the healer must give him 300k VP, the phases start again as the battle progresses.

Before facing the second boss you will have to go through a special tower, you will want to fly in the air to reach the upper floor, which will lead you to the second boss. To do this, nothing complicated, just position yourself in the center of the room and press the space bar to fly away. Be careful, if like Icarus you go too high you will have injuries - do not forget injury kits.
Second boss: Boreworm
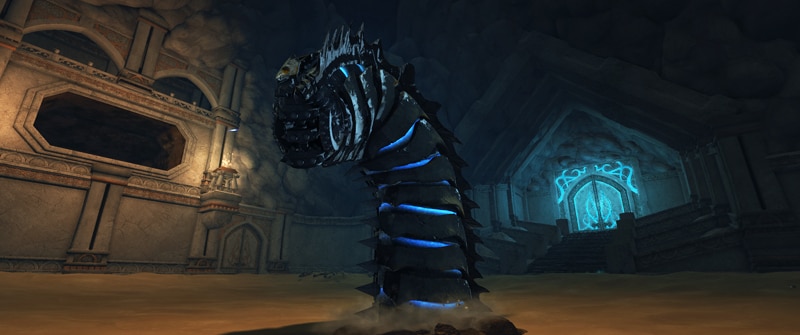
Did you survive against Acturia? Well done! But it's not over yet, you'll have to face a big Boreworm, who just wants to take you to his lair. You arrive in a room with this famous worm in the center, after engaging in combat, two distinct phases will punctuate this second boss fight.
- Phase of rocks: After a while, the boss will disappear by burrowing into the ground. You will then be thrown away from the worm and all players will have to stay away from the center of the room. A hole will appear in the middle which you will all be sucked towards - if you get to the middle you are guaranteed to die! During this phase some rocks will also fall. You must prevent them from reaching the center. The best way to do that is to use at-will powers at a distance, a single blow will destroy them. The more the rocks go to the center, the more powerful and long-lasting the next power of the boss will be (a bar on your right will tell you the number of gigawatts generated).
- Note: when this phase is activated for the second time golems will also appear. It is not necessary to kill them because the boss will then kill them and lose power by doing so. However, you must be careful, because these golems will push you towards the middle of the room in order to kill you.
- Second phase: After the end of the falling rock phase you must gather around the tank to survive. The healer will have to stay away in order to heal the group and not be taken to task by the golems that appear in the second phase (if you have too many golems around you, you can kill them). The healer should especially avoid falling rocks because he/she would be knocked over and could no longer heal the other players while he/she get up.
Last boss: Trobriand
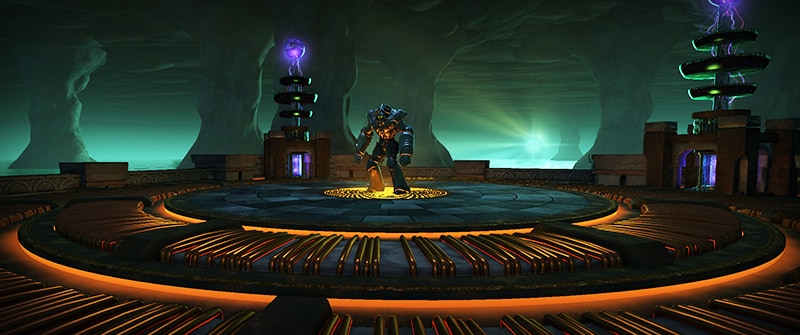
You will enter an arena flanked by 4 electricity generating pillars. And finally you will see Trobriand, the ultimate reward for your bravery.
- The tank will have to direct the cone attack from Trobriand to the Scaladar to be awakened (metal scorpions). If the tank forces our friend Trobriand to wake the scaladars (7 in total, or 8 at times), they will lose power. Nevertheless, it may be more challenging for the group, as the players will have to face not one, but several scorpions at the same time!
- When Trobriand's life has wavered from ¾, he will go to the middle to activate the electric pillars, which must be destroyed as soon as possible. As soon as the last pillar has been destroyed, Trobriand to despair will launch its ultimate power, place yourself behind the tank, which by brandishing its shield will ensure your survival (or not
 ). (Be careful to quickly destroy the pillars, first the nearest one, then clockwise, otherwise peace to your warrior souls!).
 - Note: there is a new mechanism of charges ++/-- in this part of the dungeon, created to attract/distance players, and inflicts damage when players collide.
Guide written by Melyssandria, thanks to her!
Percemer
EU Community Manager @ Gearbox Publishing
----------
Neverwinter: Discord - Facebook - Twitter - YouTube - Customer Support - Terms of Service
EU Community Manager @ Gearbox Publishing
----------
Neverwinter: Discord - Facebook - Twitter - YouTube - Customer Support - Terms of Service
4
Comments
https://www.arcgames.com/fr/forums/nwfr#/discussion/79965/
Not planned at this moment.
Not planned at this moment.
Not planned at this moment.
EU Community Manager @ Gearbox Publishing
----------
Neverwinter: Discord - Facebook - Twitter - YouTube - Customer Support - Terms of Service